Home

Wednesday, September 30, 2020

Forever Fern Birthday & Sympathy Cards

 Hello everyone,

I am back and busy in my craft room.

Today I have a birthday card, that I also used the same layout for some Sympathy cards.

I used the Forever Fern bundle and the sentiments from the Peaceful Moments stamp set.

These cards are so pretty in any color!


I made a video of me making the Birthday card. 
You can see the video here:
https://www.facebook.com/watch/?v=1210784732636456


Here is a close up of the Sympathy card, unfortunately I did not take a picture of the Birthday card and I sent it out already.
Here is the inside. Don't you think the cards are pretty in any color?

My perks for when you shop in my online store. https://bit.ly/3l0EybX

If you spend $30 in my Stampin' Store before taxes and shipping you'll earn the tutorial, spend $20 more ($50 total) you'll receive the ribbon too! Be sure and use host code : RGTYSZ6N, so I know to send you your free items.

This month the Sweet Stampin' Friends tutorial has 8 projects focused around Halloween from home decor to treat holders and cards.


Product List

Monday, September 21, 2020

Wedding Invitations

 Hello Today is wedding day!!

I'm am away from my craft room while my daughter gets married.

I made her invitations and want to share them with you, enjoy!

Her future last name starts with a "A"
her colors were Rococo Rose, Pear Piazzazz and Very Vanilla.

I made a pocket on the inside for the details card.

I had so much fun making these and honored that they wanted me to make them.

I got a little carried away when I created the invites that I didn't pay attention to the size.
I had to make the envelopes too! My cards were a custom size.

Thanks for stopping by, I'll be away for a week and I'll share some pictures when I return.
Stay safe 💙 Lisa


Sunday, September 20, 2020

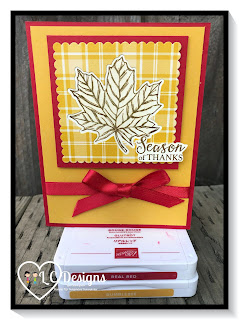
Gather Together Thanks Card

 Hello Everyone,

Hope you are doing well today.

I have another card using the Gather Together bundle.

Stampin' Up! Gather Together
This card is simple but yet eye catching.
The Real Red and Bumblebee colors go so well together.

For this card I started out with a Real Red 8 1/2" x 5 1/2" card base folded in half.
51/4" x 4" Bumblebee cardstock, wrap Real Red ribbon around and tie in a bow. Adhere to the card base.
Cut a large scalloped square using the Plaid Tidings DSP and the Layering square dies. Next cut out a large leaf in the middle of the DSP.
I cut a piece of Very Vanilla cardstock 3 3/4" x 3 3/4", I laid the punched piece on top of it and made a pencil mark at the top and bottom of the Very Vanilla piece. This way I know where to Stamp my leaf.
Stamp the leaf in Soft Suede ink on the Very Vanilla piece in between your markings.
Now adhere the two pieces together using liquid glue, making sure the leaves line up correctly.  
Adhere the layered piece to a 3 1/4" x 3 1/4" piece of Real Red cardstock, Adhere to the card front using Stampin' Dimensionals.
Stamp the sentiment on a piece of Very Vanilla cardstock in Soft Suede ink. Cut around the words with your paper snips, adhere to the front using Stampin' Dimensionals.

My perks for when you shop in my online store. http://bit.ly/2lDxU1T

If you spend $30 in my Stampin' Store before taxes and shipping you'll earn the tutorial, spend $20 more ($50 total) you'll receive the ribbon too! Be sure and use host code : RGTYSZ6N, so I know to send you your free items.

This month the Sweet Stampin' Friends tutorial has 8 projects focused around Halloween from home decor to treat holders and cards.


You can shop in my online store 24/7 here: http://bit.ly/2lDxU1T

Thanks for stopping by 💙 Lisa


Product List

Friday, September 18, 2020

Gather Together Fall Card

 Hello all,

You might notice I'm a little obsessed with the Gather Together Stamp Set and Gathered Leaves dies. These are a returning favorite in the mini catalog. I used it a lot last year and I'm finding my self using it a lot again.

My card today I used the bundle with the Plaid tidings DSP. Another favorite of mine.

This card is super simple. I started out with a Real Red card base 11" x 4 1/4" folded in half.
I used the large leaf die and cut out a leaf in the center of the front. I then stamped the leaf all over the card front with Real Red ink.
I cut a piece of DSP 3" x 3" and adhered it to the inside where the cut out is, using liquid glue.
I cut a piece of DSP 1/2" x 4 1/4" adhere it to the bottom of the card front.
I stamped the sentiment on Whisper White cardstock and cut it out using the Ornate frames dies.
I adhered it using Stampin' Dimensionals.
I finished it off with a Forever Greenery Ribbon bow.
For the inside I cut a 5 1/4" x 4" piece of Whisper White cardstock and stamped the leaf in Real Red ink.


My perks for when you shop in my online store. http://bit.ly/2lDxU1T

If you spend $30 in my Stampin' Store before taxes and shipping you'll earn the tutorial, spend $20 more ($50 total) you'll receive the ribbon too! Be sure and use host code : RGTYSZ6N, so I know to send you your free items.

This month the Sweet Stampin' Friends tutorial has 8 projects focused around Halloween from home decor to treat holders and cards.


You can shop in my online store 24/7 here: http://bit.ly/2lDxU1T

Thanks for stopping by 💙 Lisa


Product List

Thursday, September 17, 2020

Perfectly Plaid Christmas Card

 Hello and Happy Friday eve,

Is it to early to make Christmas cards? Never, always better to be ahead of the game.

My card today is using the Perfectly Plaid stamp set and I'm using the amazing Plaid Tidings DSP. I love plaid, it reminds me of the crisp cool weather and Christmas my favorite time of year.

Stampin" Up!

This card is called a panel card, I chose to use the colors that are in the DSP, Shaded Spruce and Cherry Cobbler.

I started out with a 11' x 4 1/4" Shaded Spruce card base folded in half, I adhered a 5 1/4" x 4" piece of cherry cobbler to the card base.

I then cut 3 pieces of Shaded Spruce 3 3/4" x 1 1/2" and layered 3 1/2" x 1 1/4" pieces of DSP on top.

I spaced those evenly out on the Cherry Cobbler piece, I glue down the one on the left first, then the one on the right and then center the middle one between both. This helps me space them evenly. 

I stamped two plaid trees in Shaded Spruce ink on Shaded Spruce cardstock and punch them out with the Tree Punch. I adhered the both flat onto the card base using liquid glue. 

I cut out a Shaded Spruce label using the Hippo & Friends dies. I stamped the sentiment in Versamark ink the embossed with White Embossing Powder. I adhered the label to the front using Stampin' Dimensionals.

To finish the outside I added some stars to the trees and a few white dots to the label using All the Trimmings embellishments.

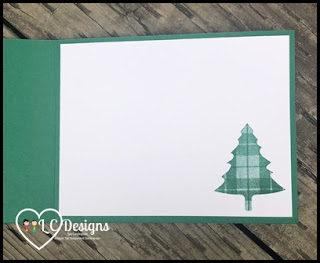
Let's not forget the inside, I added a 5 1/4" x 4" piece of Whisper White cardstock and Stamped a Plaid Shaded Spruce tree on the bottom right hand corner.

Stampin' Up!


I love how this card came out, what do you think? Are you going to try and make a panel card?

Please share your cards if you do on my Facebook page https://www.facebook.com/groups/LCDesigns1.

My perks for when you shop in my online store. http://bit.ly/2lDxU1T

If you spend $30 in my Stampin' Store before taxes and shipping you'll earn the tutorial, spend $20 more ($50 total) you'll receive the ribbon too! Be sure and use host code : RGTYSZ6N, so I know to send you your free items.
This month the Sweet Stampin' Friends tutorial has 8 projects focused around Halloween from home decor to treat holders and cards.


You can shop in my online store 24/7 here: http://bit.ly/2lDxU1T

Thanks for stopping by 💙 Lisa


Product List